Using the Agent (Chat)
Using the Default Copilot Agent
-
Enter the Agent Page
- After entering the agent page, you will see the "Copilot" agent as the default option.
- This default agent comes with deep thinking capabilities and is configured with a default model.
-
Model Selection and Auto-Matching
- During regular use, you can select the appropriate model according to your needs, or simply choose "Auto" to let the system automatically match the most suitable model.
-
Online Search and Other Interactive Features
- The page supports enabling the online search feature to help you find answers from the internet.
- If you need to upload images or use voice input interaction, the corresponding features are also directly available.
💡 Tip: Only png, jpg, and jpeg formats are supported for image uploads.

- Agent Conversation Interface
- At the top of the agent conversation interface, there are a series of practical features:
- Click the corresponding entry to start a new conversation.
- If you need to view the chat history with this agent, a dedicated entry is available.
- Supports selecting the interaction language and switching languages as needed.
- If you need to clear the current conversation, you can use the clear context feature.
- You can also maximize the conversation window to enhance the user experience.
- At the top of the agent conversation interface, there are a series of practical features:

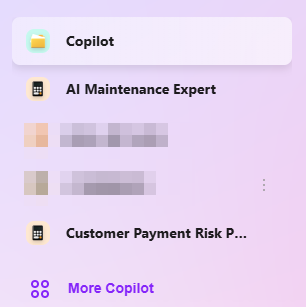
- Conversation History and Frequently Used Agents
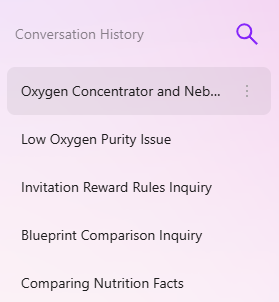
- On the left side of the interface, there is a conversation history panel that allows you to view the conversation history of all agents.
- You can rename or delete conversation history.
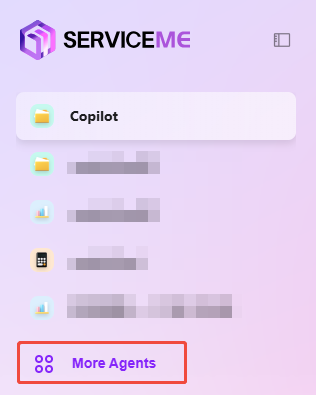
- The top of the interface displays a list of frequently used agents for quick access.
- Click "More Agents" to jump to the Agent Hub and select other agents.
- Q&A Interaction
- Copy answer content: Supports copying all content of the agent's answer
- Like answer content: If you are satisfied with the agent's answer, you can like the answer
- Dislike answer content: If you are not satisfied with the agent's answer, you can dislike the answer
- QnA correction: Select the enterprise space where the QnA is located, enter the question and answer, and click confirm to perform QnA correction

Question Guidance and Follow-up
-
Intelligent Question Recommendation and Auto-Completion
- When the user enters a question in the chat box, the system uses intelligent algorithms to automatically generate related questions that the user may be interested in for reference.
- If the user's question is incomplete, the system will automatically complete the question to ensure a smoother and more efficient interaction process.
-
Follow-up Feature
- After Q&A, users can ask further questions based on the agent's answer, files, or tags.
- The specific method for follow-up is:
- Click the file or tag after the agent's answer,
- Click "Ask Again" below the answer, and the agent will further answer based on the file and tag to narrow the scope.

Private Knowledge Base Q&A
When using the agent, if you want to perform Q&A with a private knowledge base, you can configure it as follows:
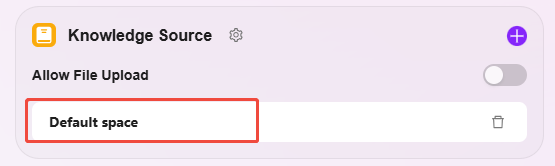
- Enter the agent configuration page and turn off the "Allow File Upload" button in Knowledge Source Configuration.
- Click the "+" button on the right side of the knowledge source to add the content of the private knowledge base to the agent.
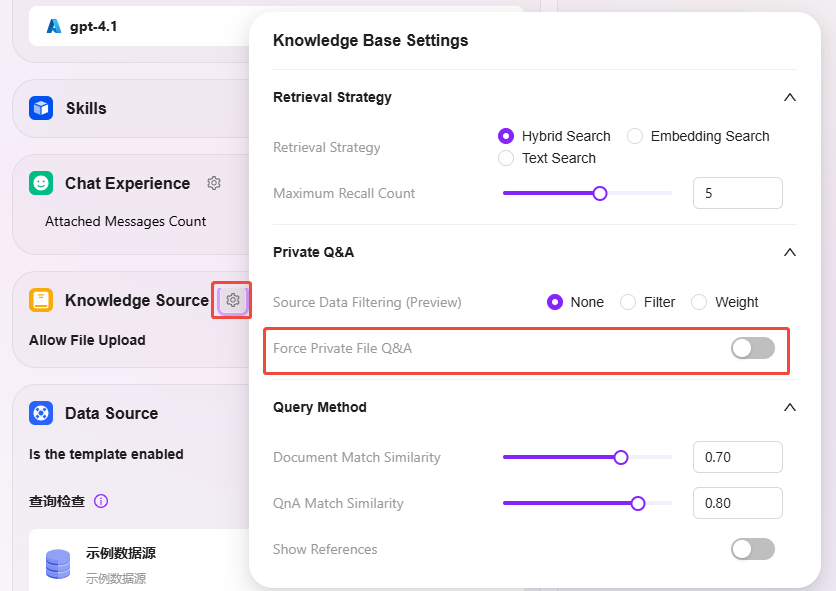
- Click the settings button on the right side of the knowledge source and enable the "Enforce Private File Q&A" option.
- After configuration, click the "Save Configuration" button in the upper right corner to successfully create a private Q&A agent.
- After successful configuration, you can perform appropriate testing to ensure the private Q&A function works properly.
💡 Tip: After the agent enables enforced private Q&A, the online search skill will be disabled by default, and online search will no longer be available.
Single/Multi-Document Q&A
Single Document Q&A
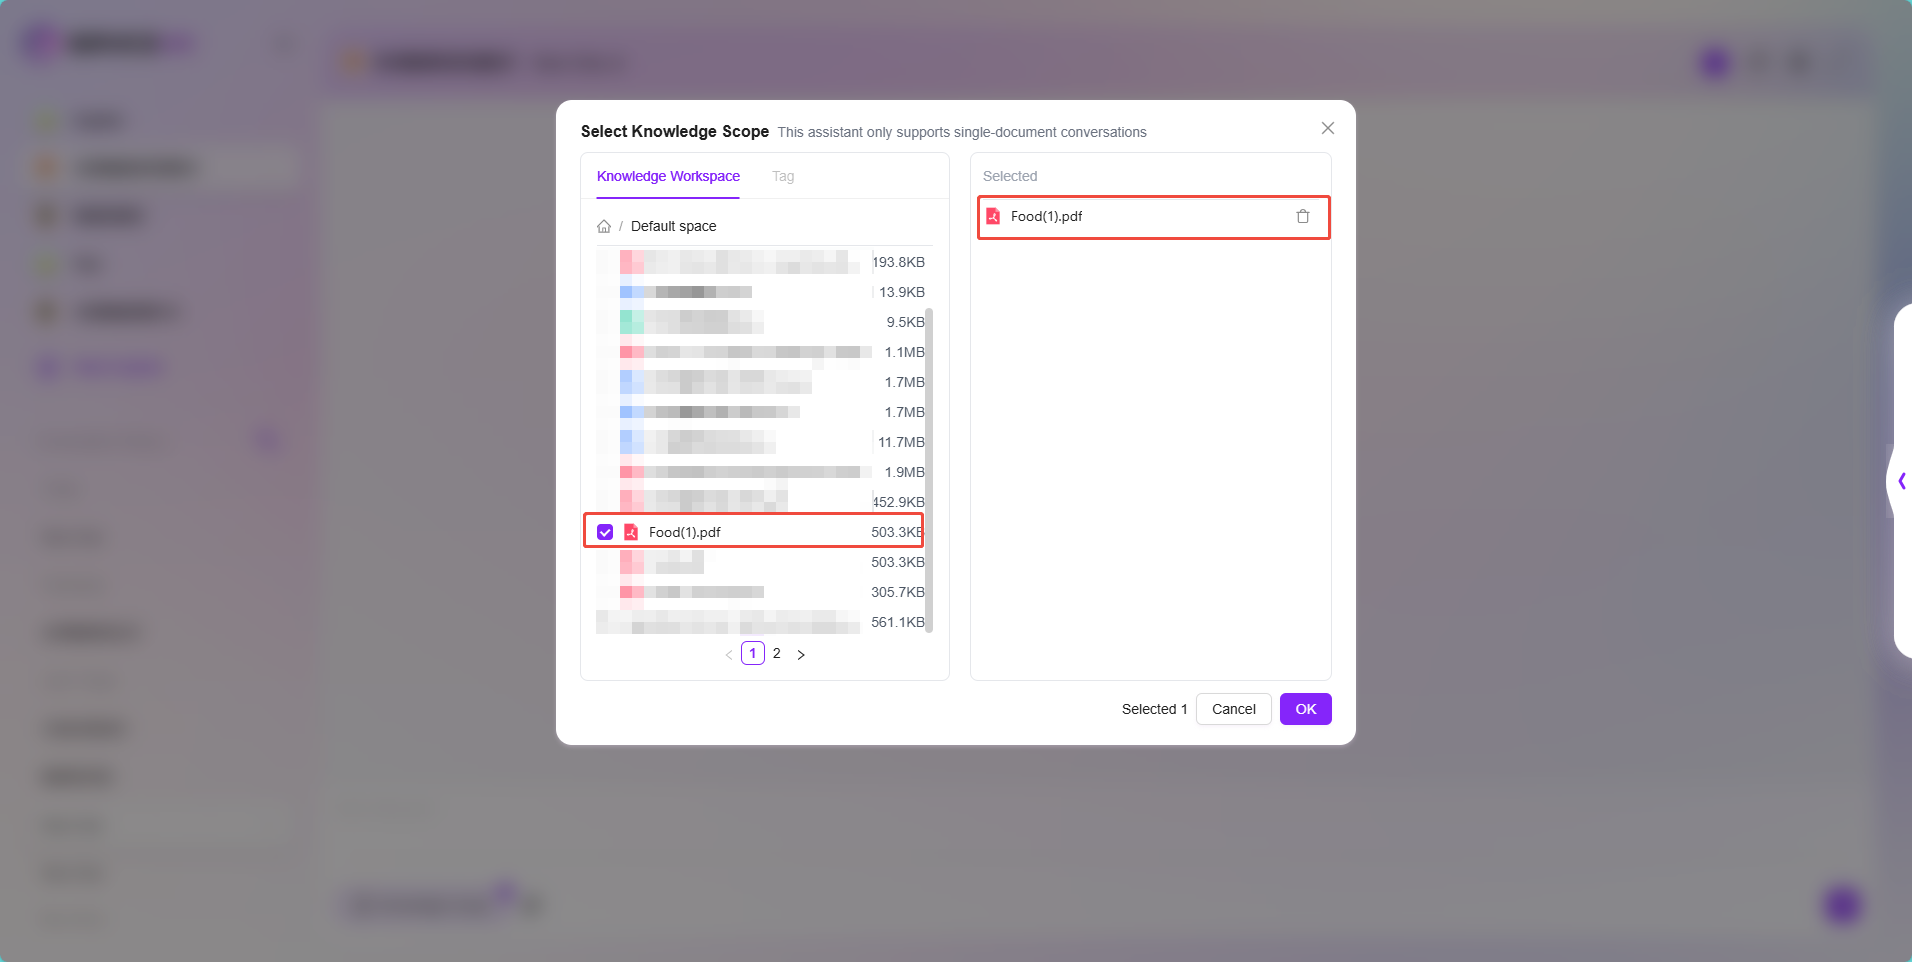
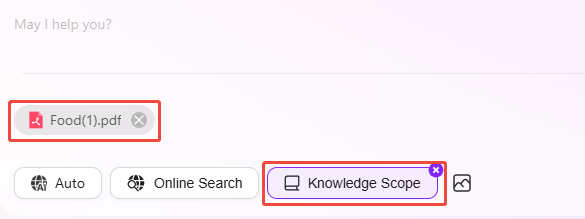
When using the agent, if you want to perform Q&A on a single document, you can select a single document in the knowledge scope after configuring the agent's knowledge source.
- Click "Knowledge Scope", select a single document, and click "Confirm"
- After selecting a single document, you can perform Q&A targeting that document
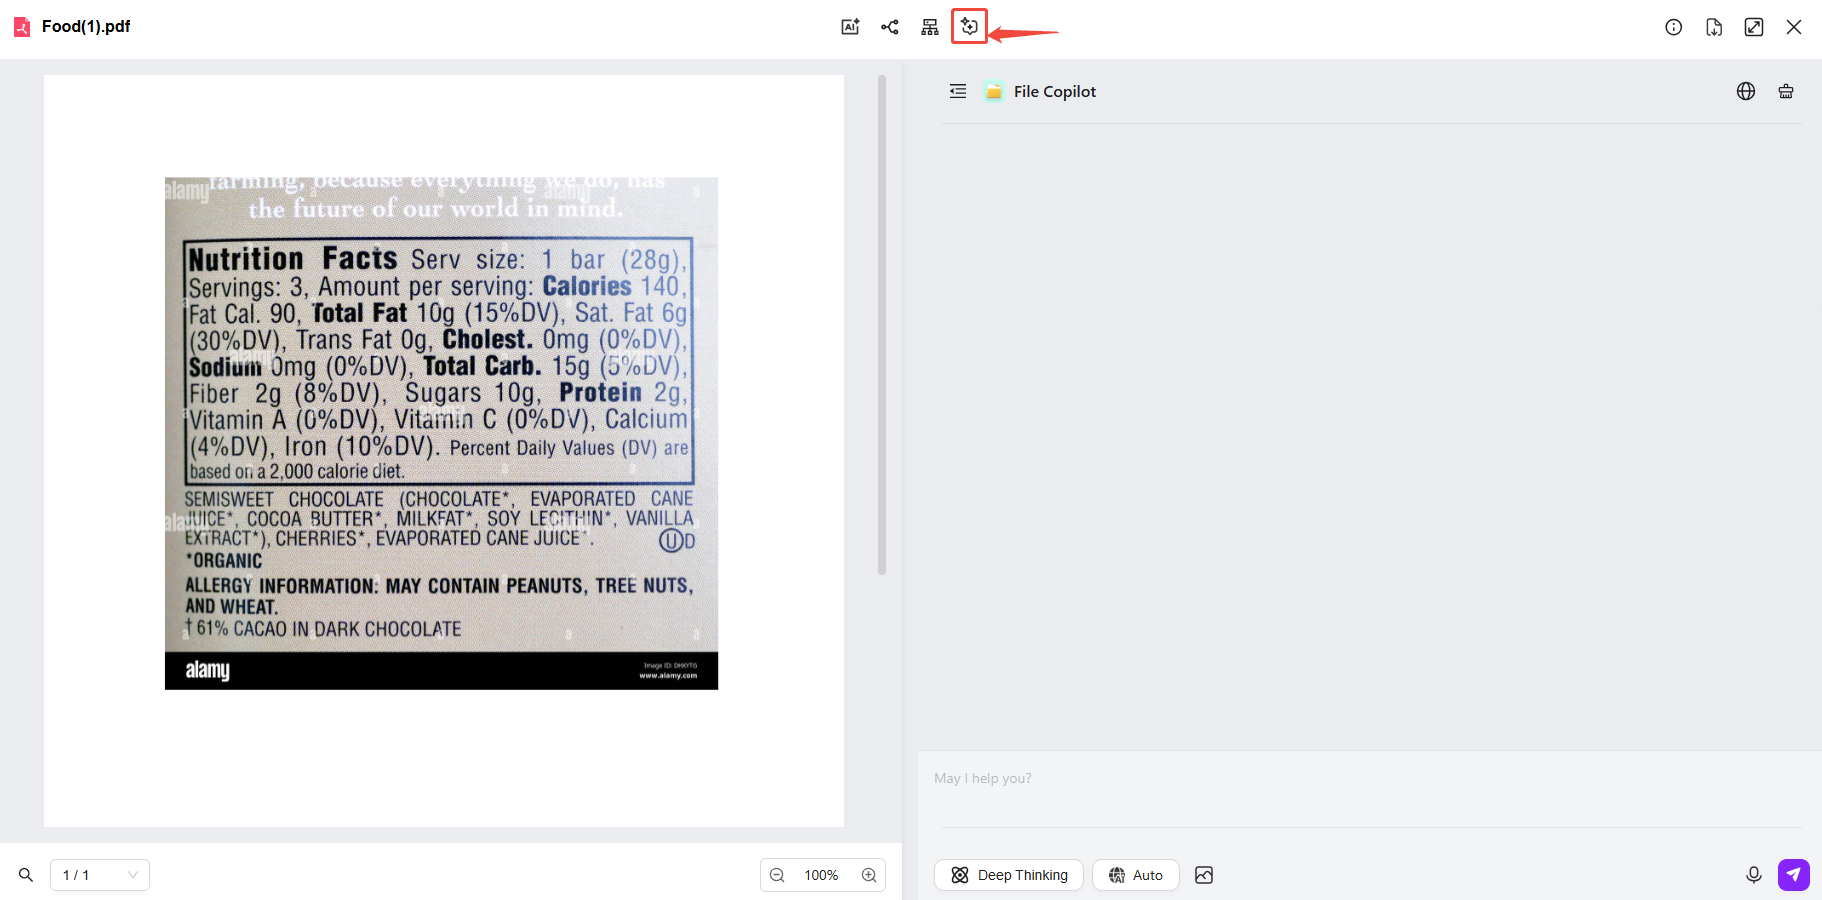
In addition to selecting a single document in the knowledge scope for Q&A, you can also use AI summary for document Q&A.
- Find and preview the document in the knowledge base
- At the top of the preview page, click "Chat" to open the agent named "File Copilot" for document Q&A
Multi-Document Q&A
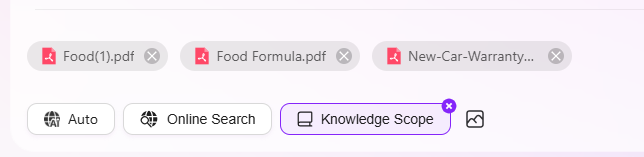
Multi-document Q&A is similar to single-document Q&A. After configuring the agent's knowledge source, select multiple documents in the knowledge scope.
- Click "Knowledge Scope", select multiple documents, and click "Confirm"
- After selecting multiple documents and confirming, you can perform Q&A on these files
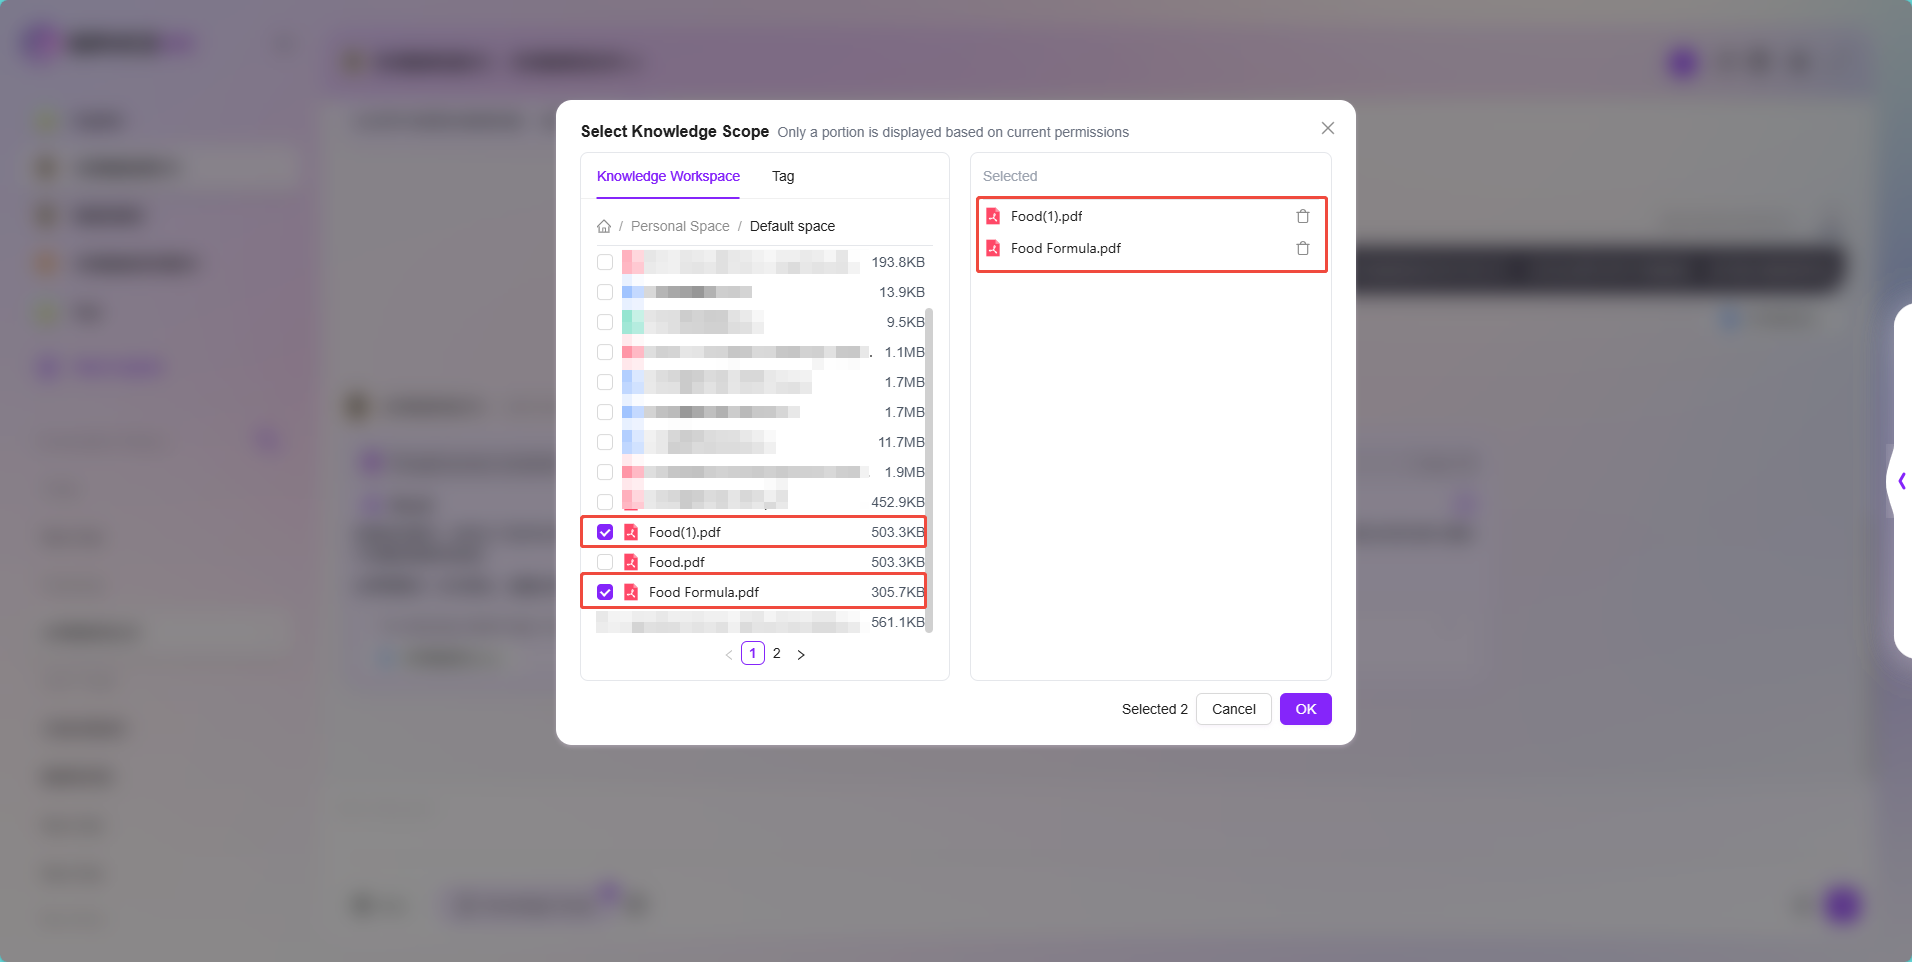
- When selecting files in the knowledge scope, you can also directly select the entire knowledge base to perform Q&A on the knowledge base. However, the prerequisite is that this knowledge base is selected in the knowledge source settings during agent configuration.
- Additionally, the knowledge scope does not support selecting folders; only files or knowledge bases can be selected.
Knowledge Base Q&A
There are two ways to perform knowledge base Q&A:
-
One way is to configure this knowledge base in the agent. When performing Q&A, select this knowledge base in the knowledge scope to perform Q&A on the knowledge base.
-
The other way is to enter the knowledge base page, where there is an "Expand Q&A Chat" button in the upper right corner. Click it to use the knowledge base Q&A agent.

Agent Hub
All agents are in the Agent Hub, where you can search for any agent. If you have permission, you can also create agents in the Agent Hub.
The entrance to the Agent Hub is below the frequently used agents list. Click "More Agents" to enter the Agent Hub.

How to Create an Agent?
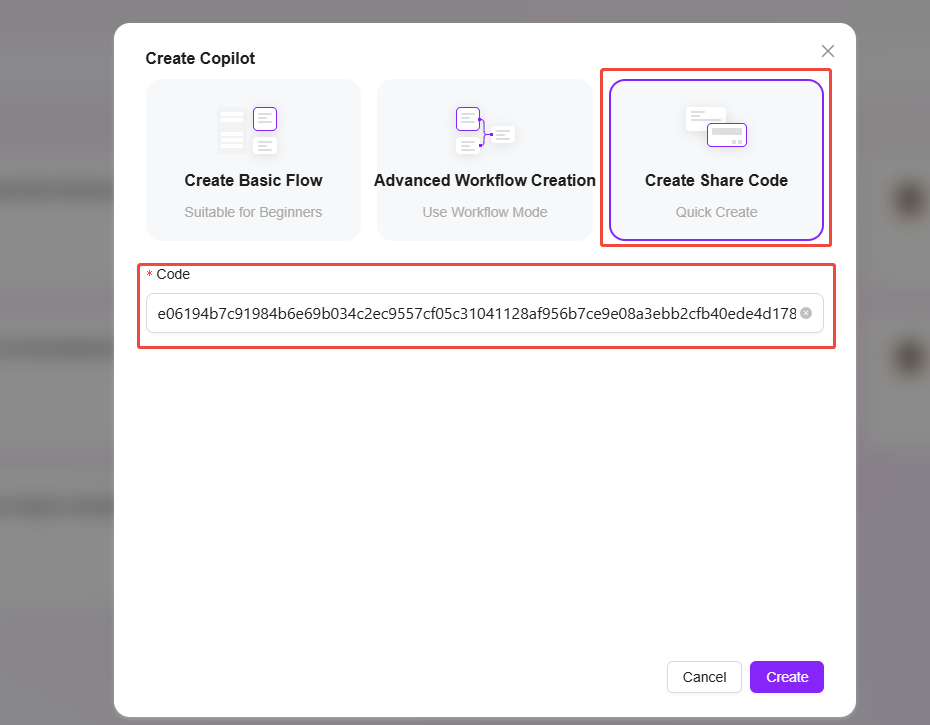
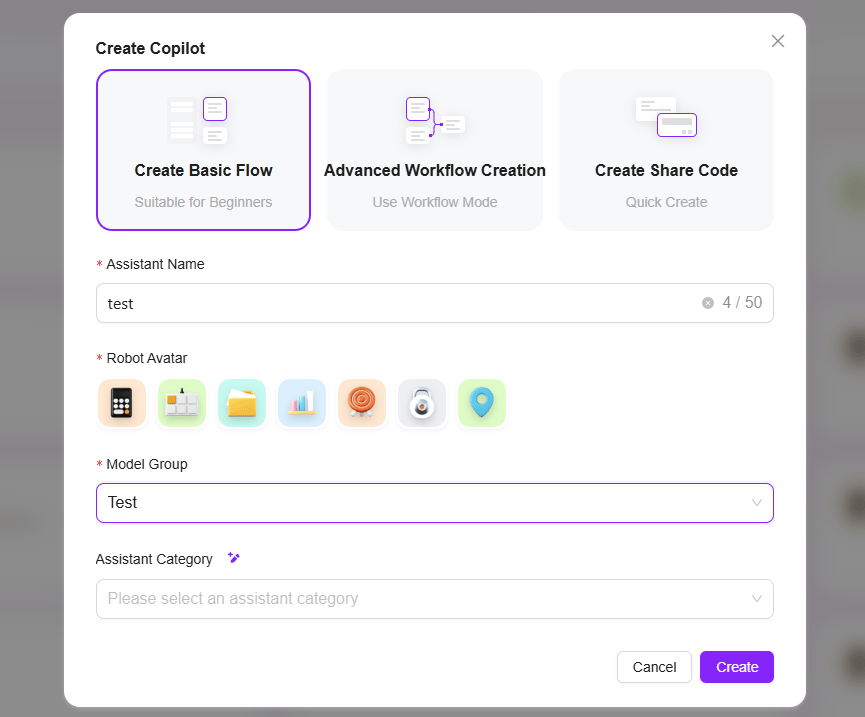
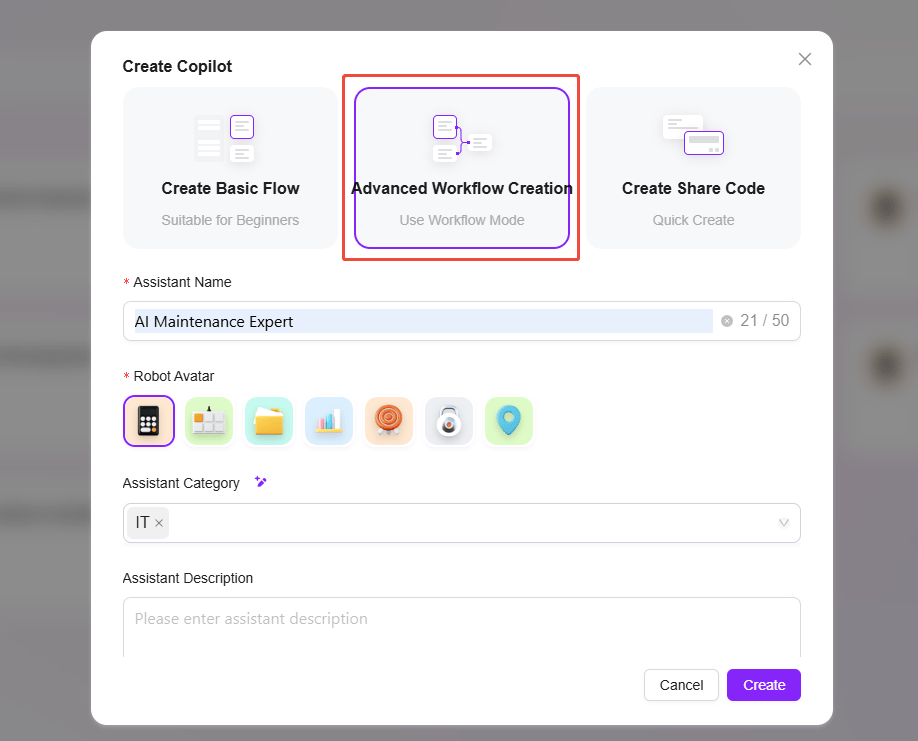
There are three ways to create an agent: Basic Orchestration, Advanced Orchestration, and Share Code Creation.
Among them, Basic Orchestration is more suitable for novice users, Advanced Orchestration allows the agent to achieve more complex functions, and Share Code Creation can directly migrate existing agents.
💡 Tip: Creating an agent requires the permission to create agents. Please ensure you have this permission before creating.
Entry points for creating an agent:
-
Agent Hub -> Create Agent
-
Settings -> Agent Management -> Agent Management -> New Agent
Basic Orchestration
Steps to create with Basic Orchestration:
-
Click "Create Agent" from the entry point, then select "Create with Basic Orchestration"
-
Enter the agent name, select the agent avatar, select the model group, select the agent category, and add an agent description
- Agent Name: Enter the name of the agent as its identifier.
- Agent Avatar: Select the default avatar for the agent. Uploading custom avatars is not supported at this time.
- Model Group: Configure an appropriate model group for the agent.
- Agent Description: Enter a brief description explaining the agent's functions and use cases.
- Agent Category: Select the group to which the new agent belongs; multiple selections are allowed.
-
Click "Create". After creation, you will enter the basic orchestration agent configuration page. After configuring and publishing, the agent can be put into use.
How to Configure a Basic Agent?
-
There are two ways to enter agent configuration:
- In the frequently used agents list, click the "..." to the right of the agent name and select "Configure"
- Open the path: "Management - Agent Management - Agent Management", and select the agent to configure
-
Prompt: Enter the agent prompt. You can also use intelligent generation for existing prompts. The prompt is limited to 2000 characters.
-
Opening Statement: Enter the agent's opening statement. You can also use intelligent generation based on the prompt or existing opening statement. The opening statement is limited to 2000 characters.
-
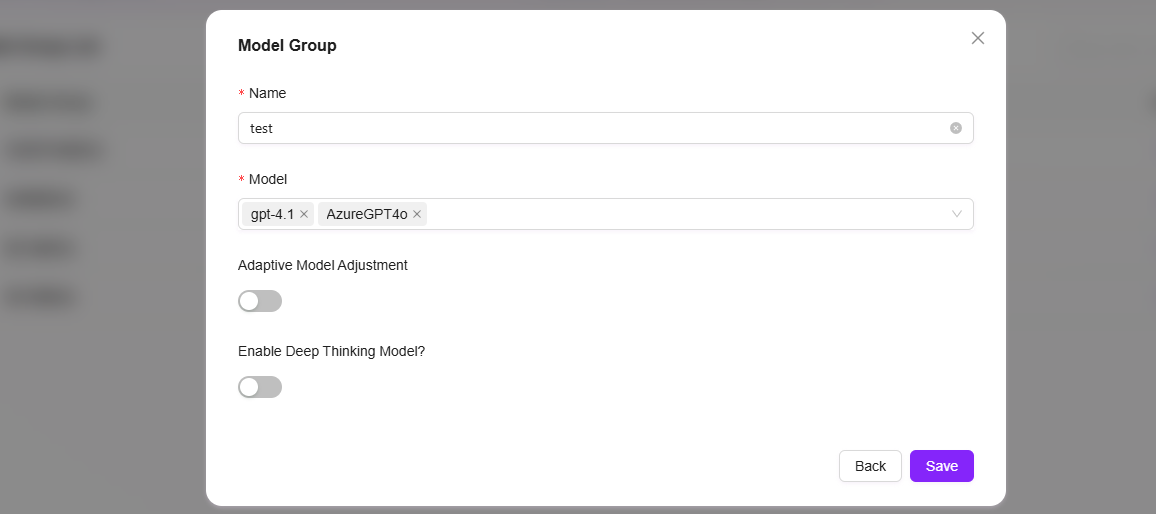
Model Group: Click "+" to add a model group. Multiple models are supported.
-
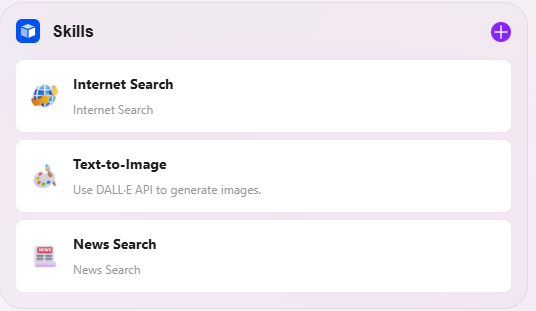
Skills: Click "+" to add one or more skills. Recommended skills can also be added.
-
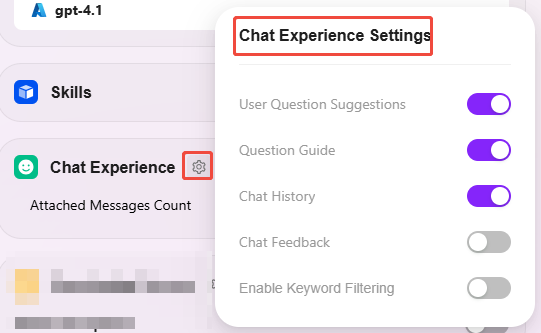
Conversation Experience:
- Mask Collection: Click "+" to add a mask collection
- Conversation Settings: You can enable "User Question Suggestions, Question Guidance, Chat History, Conversation Feedback, Keyword Review", etc.
-
Knowledge Base:
- Knowledge Base: Click "+" to add a knowledge base
- Knowledge Base Configuration: You can modify detailed settings such as "Retrieval Strategy, Private Q&A, Retrieval Method", etc.
-
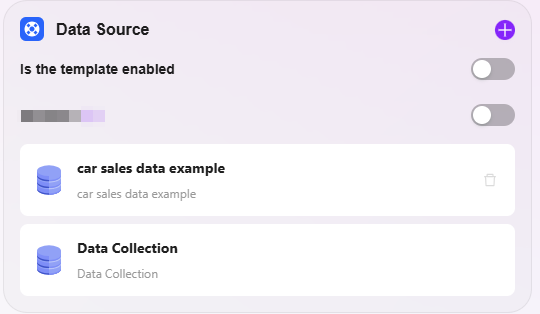
Data Source: Click "+" to add a data source as the agent's Q&A data source
-
Agent Preview and Debugging: You can preview and test the agent on the right side of the interface. After testing, save the configuration.
Model Group
Model groups need to be added by the administrator in system management first, adding multiple different models to the same model group, and then configuring the model group to the agent.

Path to add model group: Settings -> System Management -> Model Management -> Model Group -> New Model Group
- Click "New Model Group"
- Enter Model Group Name
- Select the models to add to the model group; multiple selections are allowed
- Choose whether to enable adaptive model deployment
- Choose whether to enable deep thinking model
- Click "Save"
Skills
Currently available skills include Text-to-Image, Online Search, API Function Call V2, News Query Tool, Python Function, and Webpage Reading.
-
Text-to-Image: Generates themed images based on the input text content.
-
Online Search: Connects to the internet to retrieve publicly available content (such as news, information, etc.).
-
API Function Call V2: Calls the second version of application programming interface functions to perform specific data interactions or function executions.
-
News Query Tool: A dedicated tool for searching and obtaining various news information.
-
Python Function: Functions written in Python programming language, used to encapsulate code logic for data processing, algorithm computation, function calls, and other specific program tasks.
-
Webpage Reading: Extracts webpage text, data, and other content, and parses webpage information.
Knowledge Source
Whether to allow file upload:
- After enabling file upload, you can no longer add knowledge base content as a knowledge source
- After disabling file upload, you can selectively add knowledge bases from personal or enterprise spaces as knowledge sources
Knowledge Base Configuration:
-
Retrieval Strategy: Hybrid Search, Embedding Search, Text Search
- Hybrid Search combines the results of vector search and full-text search and returns re-ranked results.
- Embedding Search finds segments by similarity and has certain cross-language generalization capabilities.
- Text Search finds segments by keywords, suitable for retrievals containing specific keywords or noun segments.
-
Max Recall Number: Range 1-8. It is not recommended to set the max recall number too high or too low, as it will affect the agent's retrieval of file content. The recommended value is 3-5.
-
Metadata Filtering: None, Filter, Weight
-
Enforce Private File Q&A: When enabled, online search and other skills will not be used. The agent's answers will only be based on the knowledge base content.
-
Document Matching Similarity: Range 0-1. The higher the similarity when matching documents, the more similar the recalled document's topic and text content are, but it may be harder to find highly relevant documents. The recommended value is around 80%.
-
QnA Matching Similarity: Range 0-1. Similar to document content configuration. The higher the similarity, the higher the match between recalled QnA and text, but it may be harder to find QnA. The recommended value is around 90%.
-
Show References: When enabled, all references used by the agent in its answers will be listed, improving answer credibility.
💡 Tip: Whether it's max recall number, document matching similarity, or QnA matching similarity, higher or lower is not always better. It should fit actual needs. If there are no special requirements, it is recommended to keep the default settings.
Data Source
The agent's data source can match already connected data sources and use them as reference data sources for the agent.
The steps to add an agent data source are simple: click the "+" to the right of the data source, select the data source, and click "Confirm".
Conversation Experience
User Question Suggestions: After the agent answers, provide some question suggestions for the user based on the previous context.
Question Guidance: During the conversation between the user and the agent, related question guidance will be provided, using model capabilities to predict possible user questions and complete user questions.
Chat History: Whether to retain the agent's chat history. If disabled, the agent's chat history cannot be accessed.
Conversation Feedback: You can like or dislike the agent's answers to optimize the agent's responses.
Enable Keyword Review: At least one of input content review or output content review must be enabled.
Advanced Orchestration
Steps to create with Advanced Orchestration:
- Click "New Agent" and select "Create with Advanced Orchestration"
- Fill in the agent's basic information: agent name, agent avatar, agent description, agent category
- Agent Name: Enter the name of the agent as its identifier.
- Agent Avatar: Select the default avatar for the agent. Uploading custom avatars is not supported at this time.
- Agent Description: Enter a brief description explaining the agent's functions and use cases.
- Agent Category: Select the group to which the new agent belongs.
- After filling in the basic information, click "Create" to enter the advanced orchestration page
How to Configure Advanced Orchestration?
Configure advanced orchestration:
- Start, End: Built-in input/output modules, input/output parameters and fields can be customized
- Model: You can select the model to use in this module, input variables obtained from other modules, and edit prompts and output messages, saving them as variables
- Skill: Select one of the skills to perform input/output actions through the skill
- Data Source: Select a data source to add reference variable content
- Code: Based on output variables from other modules, customize and create code functions
- Knowledge Base: In the selected knowledge base, recall the most relevant information based on input variables and return it
- Selector: Connect multiple downstream branches. If the set condition is met, only the corresponding branch runs; if none are met, only the "else" branch runs
- Intent Recognition: Used for intent recognition of user input and matching it with preset intent options
- Text: Used to process the format of multiple character-type variables
Share Code Creation
Share code creation can be understood as agent migration. Its core principle is to generate a dedicated share code from an existing mature agent. Users only need to obtain this code to quickly create a brand new agent, achieving seamless function replication and dissemination.
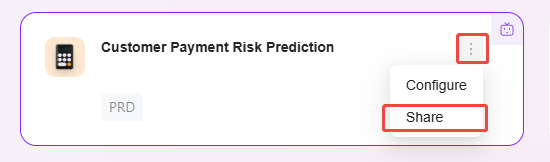
Steps for creating an agent with share code:
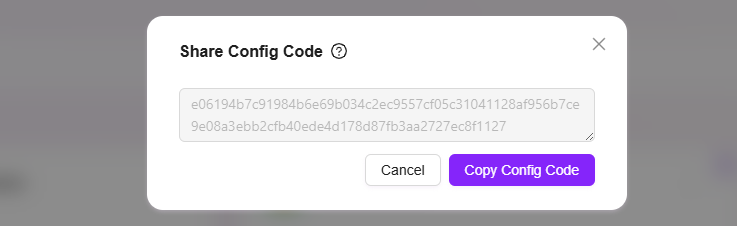
- Enter the Agent Hub, click the three dots to the right of the agent
- Select "Share", and a configuration code will be generated after clicking. Copy the configuration code for later use
- Click "Create Agent" and select "Create with Share Code"
- Paste the copied configuration code into the configuration code field and click "Create"
- You can make appropriate adjustments to the agent created with the share code on the agent configuration page to better fit the scenario